Wednesday, February 21, 2024

Reflections on The Digital Divide in Education: The Irony of AI Content Detection (they don’t work)

The photo above comes from a recent post on Medium.com by a colleague who teaches computer science at another campus. In his post, my colleague asked a very good question, but he never answered it, so I asked ChatGPT to answer it instead.

Background

The post has a provocative headline, "The Digital Divide in Education: The Irony of AI Content Detection (they don’t work)," which immediately grabbed my attention for a number of reasons. 

First and foremost is the fact that, in my own experience as an undergraduate writing instructor, AI text detection has worked very well on many occasions, yielding deeper and more rewarding experiences with my students by discussing these tools, student support at our College, ethics, academic integrity, and digital literacy in cases of suspected, potential AI-misuse, helping to cultivate a friendly, more effective student-teacher relationship rather than encourage an antagonistic, policing dynamic through the misuse and misunderstanding of such technology. 

To say that AI detection does not work simply because it does not always work seems off the mark. 100% performance 100% of the time seems a little bit of an unrealistic goal, especially for something so complex and multi-layered, not to mention the variety of tools and techniques available that can easily obfuscate such text (as the article rightly pointed out). Nevertheless, to suggest that AI detection is useless or even harmful because it does not always work and requires some degree of resources seems akin to saying that blood tests are useless because they do not always work and require significant resources that only widen the poverty gap.

Secondly, my view about money and resources spent on education does not see the money spent on schooling as an expense. Rather, I see any money spent on education, especially money spent for the education of students in lower economic brackets, as an investment in those students' economic future. When my students complain about the cost of books, I tell them the same thing. I used to struggle to buy books for my classes too when I was an undergrad. I had to choose between work and school, paying for bills, or paying for books too. 

Believe me, I get it. I understand the poverty gap, having straddled it myself as a first-generation college graduate.

But I assure most students that, if they do what they are supposed to in college and make the most of the opportunities available there, any money spent on books or anything else for college actually becomes an INVESTMENT, not an expense, paid over and again, year after year. That college degree will unlock a world of opportunities previously unavailable to them and make a significant impact for generations to come. It happened to me. It can happen to anyone... but nothing comes for free. That's just the way life works.

Lastly, my approach to these tools is highly informed by the research text-matching software systems, commonly presented as plagiarism detection software, and the need for educator training on the limitations and best uses of such technology, which I have engaged in for over three years. 

Yes, AI detection technology has limitations. All forms of technology have their limitations, but these tools offer some affordances that can help us address the very issued that my coleague appears to be concerned with in his post.

Understanding how to use our tools can ultimately help us become better users and enable us to achieve intended outcomes more effectively, in effect, by understanding how to use the right tool for the right problem.

The Question

In his post, my colleague asked, "How can educators and technologists work together to create a more equitable learning environment where integrity and honesty are upheld?"

The original question was actually a bit longer (e.g. "How can educators and technologists work together to create a more equitable learning environment where integrity and honesty are upheld, not by the depth of one’s pockets, but by the merit of one’s efforts?"), but I felt that the last part of this question included language that was evocative yet biased and ultimately unnecessary since I felt the first part of the question already assumed the second part.

Below is the response I got from ChatGPT:


Collaboration between educators and technologists is crucial to creating a more equitable learning environment that promotes integrity and honesty. Here are some strategies for working together:


1. Define shared goals:

Educators and technologists should collaborate to define common goals for creating an equitable learning environment. This could include fostering academic integrity, ensuring access to technology for all students, and promoting inclusive learning experiences.


2. Develop clear policies:

Work together to establish clear and comprehensive policies on academic integrity, technology use, and online behavior. These policies should be communicated to students, parents, and other stakeholders to ensure everyone is aware of the expectations.


3. Implement technology for integrity:

Technologists can develop and integrate technologies that help maintain academic integrity, such as plagiarism detection tools, secure online testing platforms, and tools to monitor and discourage cheating during online assessments.


4. Provide training and support:

Educators need training on how to effectively use technology to enhance learning while maintaining integrity. Technologists can provide ongoing support and professional development to ensure educators are proficient in utilizing technology tools in a way that aligns with educational goals.


5. Address accessibility issues:

Collaborate to ensure that technology is accessible to all students, regardless of their socio-economic status, abilities, or geographical location. This includes providing devices, internet connectivity, and assistive technologies to those who need them.


6. Promote digital literacy:

Work together to integrate digital literacy education into the curriculum. Educators can teach students how to critically evaluate information online, avoid plagiarism, and use technology responsibly. Technologists can contribute by creating user-friendly interfaces and tools that promote responsible digital behavior.


7. Regular communication and feedback:

Establish open lines of communication between educators and technologists. Regular feedback from educators can help technologists refine and improve technological solutions to better meet the needs of the educational environment.


8. Consider ethical implications:

Educators and technologists should work collaboratively to address ethical concerns related to the use of technology in education. This includes issues such as data privacy, surveillance, and the potential for bias in algorithmic decision-making.


9. Involve stakeholders:

Engage students, parents, and community members in the conversation about creating an equitable learning environment. Solicit feedback and involve them in decision-making processes related to technology use and educational policies.


10. Continuous improvement:

Foster a culture of continuous improvement by regularly assessing the impact of technology on the learning environment. Gather feedback from educators, students, and other stakeholders to identify areas for improvement and make necessary adjustments.


By fostering a collaborative and proactive relationship between educators and technologists, it is possible to create an educational environment that values integrity, embraces technology, and ensures equitable access to learning opportunities for all students.


Discussion


It is interesting to note that a text-generative AI system considers AI-content detection to be part of a larger, more complex strategy, involving several interdependent parts. I'd also like to point out that Points 4 and 6 are areas where educators can most effectively improve both short-term outcomes and long-term outcomes at any educational institution.


As with most things in life, the truth of the matter does not lie at one extreme or another but rather in the middle somewhere. AI and AI-generated content detection are simply too new for us to be making such sweeping statements yet. I mean, they are big, bold, and grab a lot of attention, yes.


Sexy headlines make for lots of clicks, perhaps, but I would caution rather to keep our assumptions in check. Humans are notoriously terrible at predicting the future of their own technology.


Thursday, November 14, 2019

Nano Update #2: Baby Shrimp do-do-do-do-do-do!


Last week I was surprised to discover something new in my nano tank.

At first, I wasn't sure what I was actually seeing. I thought it might be a tiny worm, you know, a planarian or something that fish-keepers commonly find in tanks that are overpopulated or overfed, or maybe just some bit of detritus that had landed on an anubias coffeefolia leaf. Then I noticed it was moving against the current, and I immediately knew what I was looking at: a baby shrimp (aka shrimplet)!

It was so small that it was very hard to see. I mean, neocaridinia shrimp are small enough, even when fully grown, but these micro-mini-shrimp have got to be the smallest babies I have ever seen... and I've bred bettas before (aka Siamese fighting fish), so I know how small some tiny baby fish  can be (I understand that bettas are among the smallest of baby fish), but these shrimplets are ridiculously small! In fact they are so small that I can't get my old iPhone6 to properly focus on them most of the time, as you can tell from the picture below, where one of the shrimplets is resting on a java fern leaf.


To be honest, I only spotted the first shrimplet by chance, really, but then I started looking around the tank and noticed several other baby shrimp. It's hard to say how many are in there exactly, but I counted at least eight this morning, roughly the same size as each other, and all of them starting to get some color.

I seem to have a habit of setting up environments that encourage fish to breed. I don't know. I chalk it up to experience, really. I've been a fish-keeper most of my life at this point, and I "ain't no spring chicken" if you know what I mean..! Even the filter on this nano tank is 30 years old (and running just fine, which is very impressive), so yeah, I've been in this hobby for a while, I guess.

Speaking of that filter, it's a little noisy, so I should probably replace the impeller - another thing I have learned from past experience - but it still works so well that I have it on the lowest setting possible. I suspect that even at its lowest setting it has probably sucked up a few shrimplets, despite the foam pre-filter over the intake tube, but if that's the case, these guys are the survivors and probably too big to get in any major anymore. They are certainly growing, and judging from their coloration and activity level, they seem to be thriving.

So what do I do now? The answer is simple. Continue with the status quo. In other words, keep doing what I've been doing all this time. In general, if the conditions are right for breeding, they are right for growing the babies out. Therefore, I continue my routine and make small weekly water changes, but I am wise enough to avoid making any major changes while the babies are growing. I only clean the algae that builds up on the front glass, just to be able to see inside better and enjoy my tank. I'm not getting rid of any algae on the rocks and plants, however. I keep it there to provide food for the shrimplets.

Anyway, here is the best close-up I could get of one of the largest shrimplets (probably a female, given her growth and the fact that female neocaridinia shrimp are larger than males. I can't see any details on the shrimplets with this camera, but I already have a new iPhone XR waiting to be activated, so I expect to have much better pictures the next time I post.


Keep those elbows wet!


Friday, September 6, 2019

Nano Update 1: Bloody Mary Shrimp


It's been two months since I set up the nano in my office, and nothing has died yet.

That's always a good sign.

I'm glad I waited all this time to finally add some shrimp. It helped me make sure that I knew what I wanted and could find a good deal on what I wanted. I knew I was going to be out of the office all that time, so it was not a good idea to introduce any live animals to the tank anyway.

Instead, I just dropped in a couple of times during my vacation, just to make partial water changes and top off the tank. The plants suffered a bit when the water level dropped after the first three weeks, but I was surprised to see they all survived with just a 15 watt incandescent bulb over the next several weeks. I even got some algae to deal with! Go figure...

I really have to get some better lighting soon, as can be seen from the leggy growth (the distance from one leaf node to another) on the staurogyne repens in the foreground, but to their credit, they are alive too! They aren't thriving, but they are definitely surviving even without strong lighting, which I expected form the other plants but not really from staurogyne repens. I trimmed the dead anubias leaves when I got back from summer vacation but left a little debris for the shrimp that I knew I would soon be buying.

I received them a couple nights ago and brought them to my office the next morning, acclimated them, and transferred them to the tank using a net (to avoid contamination from their water). All seven shrimp survived the trip and seem to have settled in nicely now, grazing on the plant leaves and the little bits of debris that have collected on the sponge that covers the filter inlet tube.

They looked so nice when I came in this morning and saw the tank, that I felt inspired to make a little video of them as an update. Enjoy the scape, listen to some dope beats, and relax.

Thanks for stopping by!

Peace!

Monday, June 17, 2019

Nano Nano!


A couple months ago, a small octagonal tank mysteriously appeared in my garage, and I decided to do something about it.

Having kept fish, plants, and all manner of tanks for many years now, people tend to offer me their tanks and equipment after a while when they've lost interest in fish-keeping. Most of the time I get what I consider to be beginner-type equipment such as colored gravel and plastic plants. I don't want to act snobbish about it because most of us start out with that type of stuff, but sometimes I get lucky and get something cool like an industrial chiller that a colleague gave me one time. I haven't used it yet, but that's something I consider to be pretty cool (no pun intended) if I ever intend to keep some sort of cold-water species. No need for it now, but you never know..!

In any case, I was immediately attracted to the little 5-gallon as a potential hospital tank (this helps keep medication costs down if fish ever get sick) but quickly realized that I could throw some of my cuttings in there and create a pretty nice little nano tank for my office at work. I had a spare HOB power filter (a 30-year old little workhorse, once known as an Aquaclear Mini but now they are called the Aquaclear 20) set up and running anyway, so ultimately, that's what I decided to do. I washed it out and gave it a new home in my office at work.

For hardscape, I went with some nice grey seiryu stone to match the grey walls and furniture of my office. I figured it would blend into the environment and help the plants pop more. I found a vendor on Amazon with some good prices (and good reviews), so I took a chance buying 17 lbs of the stuff for $30. It seemed like a better deal than my LFS, and the reviews were pretty impressive. Man, was I glad I went for it! The rocks were beautiful! I thought I was going to have a couple of pieces left over, but it turned out to be just the right amount and in the perfect sizes for this tank.

Here is a picture of the tank when I first put in the rocks, just to get an idea of the layout.

This was the final hardscape layout I settled on. Let me know what you think!

A couple days later, I brought some cuttings from the plants in my 90-gallon. I didn't disinfect them, so I know that this is going to introduce some snails and probably some pathogens too, but I don't plan to stock this with anything for a few months, so there will not be much for them to survive upon and they will probably die off naturally. I'm not too worried.

I later ordered a small bag of extremely expensive substrate. I've never really used any fancy aquascaping substrate. I went with pea gravel from the gardening section of Walmart when I set up  my 90-gallon many years ago, and I'm pretty happy with it, but I wanted to try something new, so I went with this cool, aquasoil. The 1-liter bag set me back about $10, which was remarkable for such a small amount, but it was just about enough.

Here is the final result! I placed my travel mug next to it to give you some sense of the scale. I think it looks pretty good.


This next picture is what it looks like when I first step into my office in the morning. I think it's pretty cool. My students and colleagues seem to like it too. What do you think?


I know I want to put some Cherry Shrimp or Bloody Mary Shrimp in there, maybe some other type that won't interbreed with them. I also want snails. I'm a little more apprehensive about fish though. It's not a very big tank, so not many fish would be happy there, despite the more than adequate filtration and circulation, plus it's not very warm. That limits me somewhat. I love bettas, and this would make a nice betta tank, but I want to keep shrimp, so a betta is out of the question. I've never kept gouramis but a dwarf gourami might work but I'm thinking even smaller, like maybe endlers or some other small livebearer. I already have 43 neons at home, so no neons. I want to try something different.

Let me know what you think in the comments below! Till next time! Keep those elbows wet!

Sunday, March 10, 2019

90-Gallon Update & Ideas for 2019

90-gallon Update

My last post was way back in May of last year, and a lot (of really good stuff) has gone on in my personal life since then, including my tremendous wedding and an incredible two weeks in Italy and France. It has truly been a roller coaster of the most incredible kind this past year or so.

Needless to say, however, my tank has borne the brunt of my negligence. I had some pictures of the tank back in mid- July that I never posted, so I think I'll start with those pictures first, a sort of then and now...

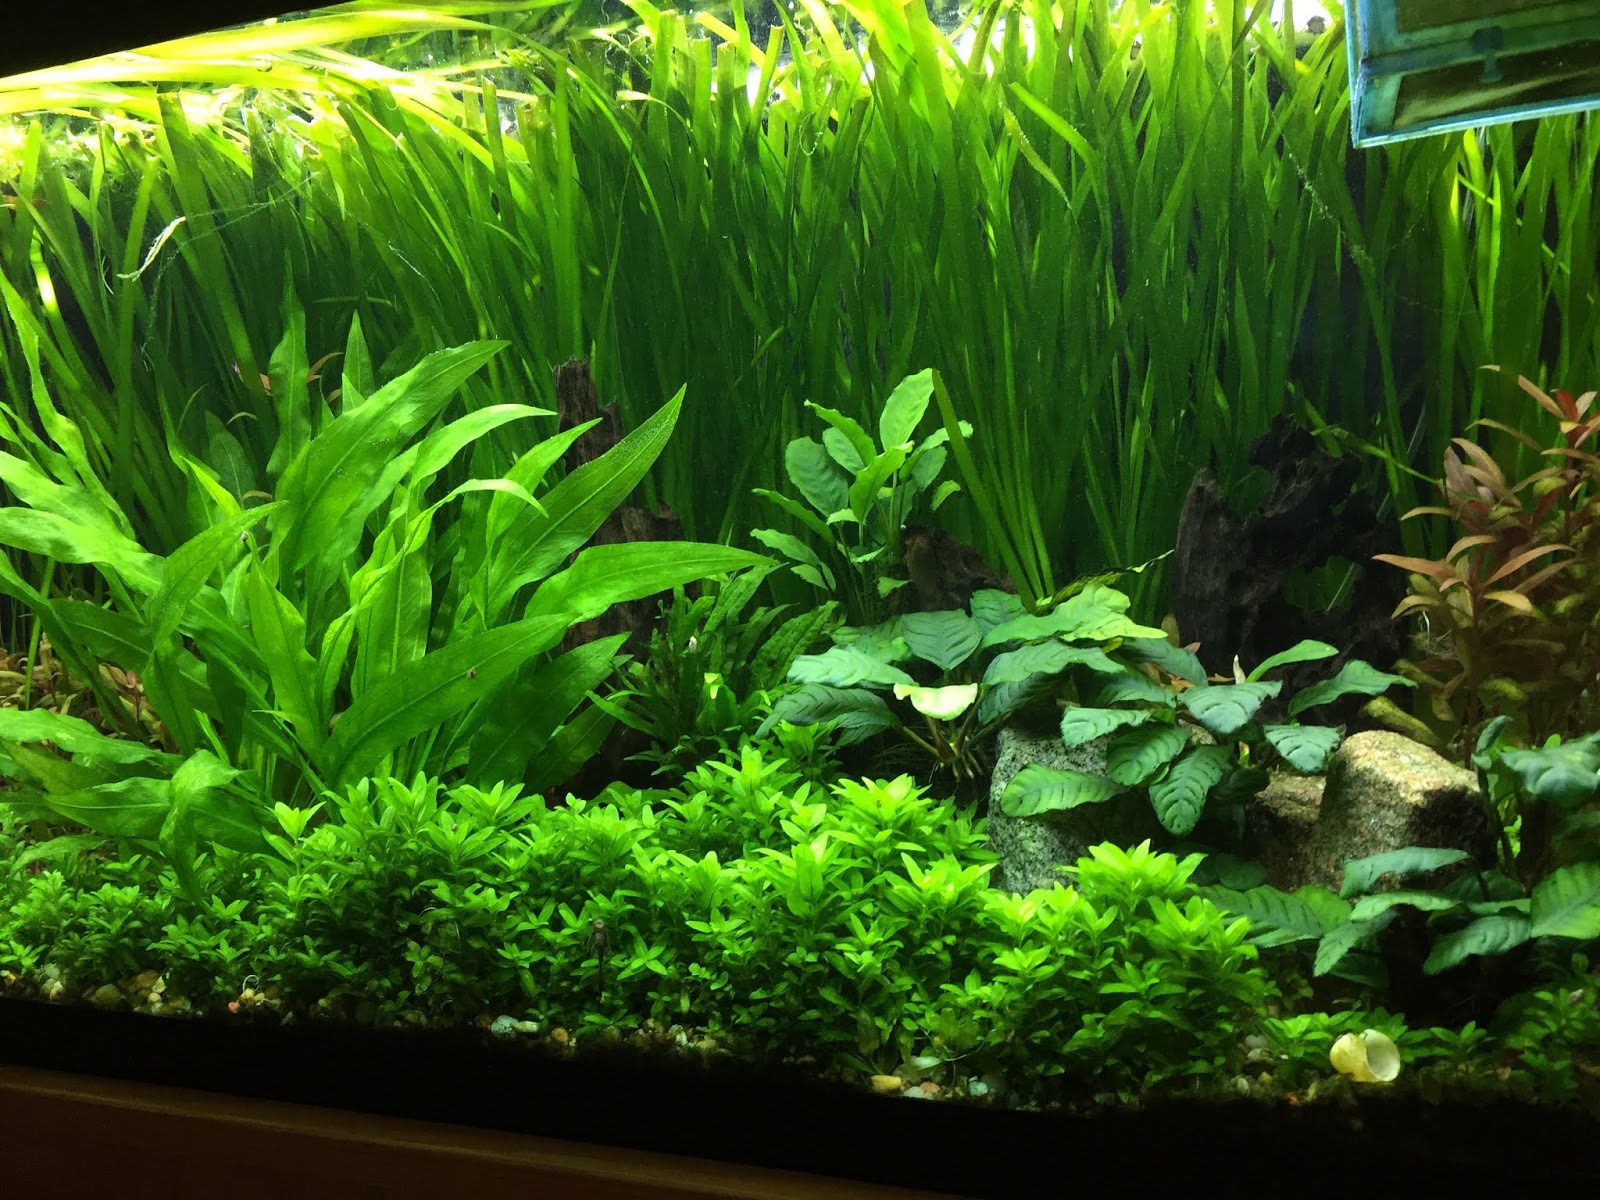
First, lets look at the tank on July 14 last year. I picked three pictures that show slightly different aspects of the tank, so I will start with the one that focuses a little more on the lush carpet of staurogyne repens along the foreground.

If you're wondering what the little blue box is, by the way, it is an enclosure where I deposit the babies as I find them, to keep them from getting sucked into the filtration system.


It took a lot of work to get that lush carpet of staurogyne repens you see here, and there is more to the tale of this staurogyne repens that I will detail in a future post. If you look carefully, however, you can see that I was already letting things go. There are some strands of algae on top of the vals.

That repens looks lush here too, but it badly needed a little trim too, and boy did it get one this past weekend! I only hope it's not too late. I'm pretty confident they'll be fine. We'll see.


I really love the broad, bright green leaves of these Amazon swords. They grew even more lush soon after this picture was taken. Believe it or not, I have kept this particular line for about twelve years, and I have brought them bac from the brink on more than one occasion.

Speaking of bringing them back form the brink, about 20 baby ancistrus (aka bristlenose plecos) got out of the blue plastic and mesh breeding container you see in the top right side. Somehow, the separator fell to the bottom of the tank instead of staying at the top. The suction cups went bad or something, but either way, the baby ancistrus all escaped into the tank, and when I neglected to feed them - I decided to let them go hungry for a while because their waste was throwing off the water chemistry too much - they started in on the Amazon swords. You'll see some of that damage later.


Ancistrus  have another downside: They are known to poop - a lot - and having over 25 or so in a 90-gallon tank is never going to be a good idea unless you are making regular large water changes. I'm paying the price for my negligence though, believe me!

7 months later...

I stopped taking care of the tank as much, and I have paid the price. I should have taken pictures before I started cleaning up, but I thought of it too late. Now let's take a look at what's left after cleaning things up a little, following seven months of neglect.


Looking at it now, it doesn't seem so bad. I mostly see just a lot of yellowing of the leaves, which was to be expected. After all, I hadn't added any liquid fertilizer in about six months and had only topped off the tank from time to time instead of doing regular water changes. That's also what saved it from being drowned in algae. I had also trimmed much of the damaged parts of the jungle vals, which were looking rather shredded before, so the picture really does not do the damage justice. However, the following picture shows a closeup some of the damaged leaves of the sword plants. 


Here's one of the (cute!)little bastards below, probably taking a break from munching on my swords.


Though you can't see it well in these pictures, I trimmed most of the staurogyne repens really hard, as evidenced  by the cropped bare stems int he pictures below. The staurogyne in the picture above, however, was spared for a week. I just got tired of trimming and replanting.

I'm working with 48 linear inches of staurogyne for a carpet. It can take hours to trim and replant.

The bottom of their stems had gone bare from being drowned out by the leaves above them, but now that they are exposed to light, and I'm hitting the tank with ferts again, I fully expect them to bounce right back.

Believe it or not, I've seen worse, like when a strange disease (a least it seemed like a disease) melted the repens to the point that I thought I was going to to lose it all, only to see it come back in less than a month.

Here are a couple pictures of the tank a week later (March 2). You can see that the plants are starting to recover and their colors are getting stronger.


Anyway, it's time to post this long-awaited and highly unanticipated update... finally! 😃 We'll take a look at the fish room next time. I promise. I've got some updates on that too, coming soon...

Keep those elbows wet! 


Sunday, May 20, 2018

90 Gallon Update: The Heady Days of CO2


90-gallon Update

The Heady Days of CO2 

After just 21 days since my last post, I can already see a great deal of new growth in the 90-gallon tank. I've had to trim the valisneria at the waterline to keep it from blocking the light over the alternathera reinicki mini, the red plants on the left side of the tank. What's worse, the vals were developing those long strings of algae at the top of those long, beautiful strappy leaves, and I was not surprised, given the fact that they were as close to the lights as any plan can get. I had to resolve that algae issue as soon as possible. I know how hard it can be to get rid of that air alga once it gets established, so I'm always looking out for new strands to remove them as soon (and cleanly) as possible. Any little piece that breaks off can start a new strand, so I have to go slow and carefully each time. Trimming the leaves just seemed to be a more effective way of getting rid of both issues in one fell swoop.

I cut back a couple of leave at the water line first, just to test it. I wanted to see if the leaf would die and melt away. If so, I wanted to see how that affected the plant. To be honest, I don't see that it hurt much at all. In fact, it might be the reason why those vals are threatening to overrun the tank! It definitely made removal of that hair algae much easier.


It's pretty clear that the vals are booming. They are sending out runners everywhere, and growing by the day. I'm definitely going to have to remove several of them soon before they overgrow the tank.


The little blue basket up in the top right corner of the tank is where I am holding about 20 baby ancistrus.  I intend to move them over to the mini-fish room in the garage to grow out, but I'm somewhat hesitant because I had so many die that way last time (I know at least one of those babies survived, but it looks like it was probably only that one because I haven't seen any others in a really long time). I treated that tank with meds and water changes a few weeks ago, and everything has been fine for a long time, but I'm still a bit wary. I want them to get a little bit larger before I move them.


Speaking of ancistrus, here is one of the larger ones in the 90-gallong tank. I wanted to demonstrate with this picture how much the stringy little alternanthera reinicki mini has grown and how strong it has become (check my last post), given a steady supply of CO2 and smaller, regular doses of ferts.


Since it kind of fits with the whole theme of aquatic plants and nature too, I decided to share a picture below of my youngest son on a recent class field trip to Billie Swamp Safari on the edges of the Florida Everglades. Alligators are "kind of our thing" down here in South Florida...


Sunday, April 29, 2018

Let's Get Planted!

Planted Tank Tips 

After lightly dosing the planted tank I keep in my living room with trace nutrients earlier today, it occurred to me that I could share a few bits of wisdom that I've gleaned over the last couple years of keeping a planted tank. I have to offer a disclaimer, however, that I am not an expert on this topic by any measure of the word. Instead, I approach this topic as little more than a hobbyist who has had his share of successes and failures with planted tanks over the years.


Here are some tips (in no particular order)...

  1. Lighting and Plant Selection: Go with low light plants if you don't have good lights. Start with the easy ones like anubias and java fern (or java moss if so inclined), moving up to amazon swords and others before you go with more difficult plants. Watch a few YouTube videos and read a few online forums to familiarize yourself with the needs of the plant. Then try not to mess with the plant too much after you set it in the tank. Give them time to adapt. Patience is essential in the early stages.
  2. Lighting: Get decent lights. They don't need to be any particular top brand, or any name brand at all. Just get as much coverage and as bright a light as you can. I have had success with relatively "low-cost" LED light strips (the white/blue type, not the flexible strips) that I bought on eBay, but I still spent about $100 on lights for my main tank all told, just to have enough coverage. I have also had a great deal of success with LED floodlights (similar to these) in my fish room.

    Tip: If you're going with floodlights, look for something in the daylight color range (6000K).
  3. CO2: CO2 definitely helps. The level of CO2 in your tank will limit your plant growth. You can go with the liquid form at first if you're not sure about the relatively steep cost of starting up a CO2 system, but if you stick with it, you will eventually want to get a tank, regulator, diffuser, and CO2 airline. Don't worry. It's worth it.

    In an aquatic environment, CO2 is not as abundantly available as in the air we breathe. Increasing the level of CO2 in your aquarium will make your plants grow faster and better. This is the fuel for their cell-building. More fuel means more more cell-building. Isn't that the point? As an added bonus, CO2 helps control algae as well!

    Tip: Keep the dosing of CO2 constant as well. Fluctuating CO2 levels can be problematic.
  4. Fertilization and Algae Control: When using liquid nutrients, spread the dose across the days of the week. For example, if your total dose of a given nutrient is 9 capfuls once per week, administer it as 3 capfuls, 3 times a week instead. A plant can only consume so much at any given time. Once it hits the maximum rate of absorption, the rest of the nutrients are left floating in the water column, ready for any algae that might be lurking in your tank. Plants are able to uptake nutrients much more easily when the dose is spread out, and it leaves fewer nutrients for algae to consume in the end.

    NOTE: This is definitely a balancing act with any waste that you might have coming from fish, invertebrates, or other life in the tank too, including the remains of dead, wilted leaves which decompose and add more nitrites to the system. Dead leaves are inevitable, and fish waste is a natural source of nutrition for an aquatic plant, but it can get out of hand very quickly, especially if you have a large die-off of plants, an over-stocked tank, or too much food waste. 

Thursday, January 19, 2017


The Fish Room Project

Update #6 

Well, they'e done it again! My discus fish are in full parenting mode. I wasn't going to raise this new generation of discus yet, but my curiosity got the best of me, so I'm going to give it a shot. I really want to see what this new generation will look like. I'm hoping for solid- to near-solid cobalt blue. They have good genes, so it is very possible to get some really nice fish from this batch of wrigglers.

Here's a video of the proud parents and their brood. They moved the babies to the sponge filter elbow. This is a much better spot than the canister filter intake tube where they laid the eggs. Now I can cover that intake with a piece of filter floss.


I am planning to automate many of the functions that I will need to perform. It should be easier to maintain the tank this time, but I'm also going to make a couple of changes to accommodate the babies I might eventually raise from this brood.

I made a couple of changes in the 4-tank system too. I added a bag of Seachem® Purigen to the sump. I also cut out a couple layers of flat filter material I had used once in a failed attempt at a divider and put it over the bio balls in the trickle tower portion of the filter. I had it lying around for a while and finally figured I'd give it a try.

Let's see what happens.

Monday, January 9, 2017

Bonus! My Visit to Jack Wattley Discus Hatchery


Bonus!

A Visit to the Jack Wattley Discus Hatchery in Miami, Florida!

Before I begin, I have to say that this is one of my absolute favorite fish-nerd places to geek out at in Miami. If you know about discus fish, you will easily recognize the name, Jack Wattley. Mr. Wattley is one of the best-known authorities in the field of discus breeding around the world. In fact, he is one of the principal founders of discus breeding culture in the United States, having published several articles and books, and lecturing at national and international conferences over the last several decades, ever since discus-keeping took off in the United States beginning in the 1960's. Needless to say, I really wanted to write about this hatchery for a long time.

Last March (2016), I decided to visit the world-renowned Jack Wattley discus hatchery in Miami, Florida (https://wattleydiscus.com). Unfortunately, Mr. Wattley does not run the hatchery himself anymore, having retired and delegated that responsibility to one of the hands-down coolest and most knowledgeable fish-breeders you will ever meet, Gabe Posada, who is doing an outstanding job of running the hatchery for Mr. Wattley nowadays. Luckily, the hatchery is in very good hands. Gabe is extremely knowledgeable about discus-keeping, and I find him to be a very open and friendly guy with everyone who stops by, not just me. That's a character trait I admire in the people I meet, and I am happy to see that the legacy of Wattley Discus is in such capable hands. Gabe is always happy to share all sorts of valuable information for both novice and experienced discus hobbyists, so I'd strongly recommend you pay him a visit there whenever you're in town. Just call ahead of time to make sure he knows!

Here are some pictures of my visit last March. As you can see, there are many outstanding, high-quality specimens of several different varieties of discus.

The wild discus fish shown below are the biggest I have ever seen! They are about as large, maybe larger, than my fully open hand!

I found these albinos to be particularly eye-catching. This picture does not do them justice, but I'll post it anyway.

Here are some Heckel discus (some "wilds" too, I think)...

Again, the albinos...


This is me, showing one aisle of the hatchery, from about the middle.  I strongly recommend you visit and support this valuable contributor to the development of the discus raising hobby if you are interested. It's worth the detour on your way to the beach!


See you next time!


Saturday, January 7, 2017

The Fish Room Project: Update 5


The Fish Room Project

Update #5

A picture of my fish room.

There you go! Another year come and gone, and my fish room has been purring along beautifully for several months.

I'm about a week late in posting this (I meant to post something on New Year's Day), but I am so glad that 2016 is finally over! It was an action-packed roller-coaster of a year for me in so many ways, and 2017 is promising to be every bit as crazy too. At least I've got my fish room though! It's been up and running now for several months, after having worked out the plumbing, lighting, filtration, electrical connections and cycling the tanks for several months. 

I know I didn't have to cycle the tanks so long - a month would have been enough, probably - but I was too busy with my job during the spring and early summer to be able to dedicate much time to the system, and when I did finally have enough time on my hands, we had to tent the house for termites. This meant removing all of my fish, unplugging and covering my tanks, and removing the water. They said that the poison gas would not penetrate the water, and the foggers that my wife and I set around the house afterward (to kill the ants and everything else that would eventually return) are not supposed to penetrate water either, but that doesn't mean it would not affect the water quality would be unaffected by the temperature and lack of water circulation for a few days. The dead bacteria in my canister filters alone could have killed everything in a tank, so I took the opportunity to clean the filters thoroughly, replace most of the water in all of my tanks, and begin the cycling process again.  Unfortunately, I went a little too far with the planted tank in my living room, making an almost 100% water change, using water straight from the hose, on a day with record high heat for South Florida. Needless to say, this was a mistake (aka "learning experience") that I do not intend to repeat. I wound up killing most of the plants, but a few Amazon swords did survive and a few valisneria spiralis melted down badly but not completely. I let that tank cycle again before replanting it, and I am happy to report that everything in that tank is thriving now. 

Here's a picture of the planted tank in my living room. It's not technically part of my "fish room" per se, but I have been moving plants over to the fish room tanks as this tank becomes crowded and overgrown with plants and I occasionally have to thin it out.

A picture of the plants in the 90-gallon tank in my living room.

I'm glad to see that all of my tanks are doing great lately. They have reasonable bio-loads, about 20 gallons per fish on average, and I've recently increased my water changes too because I am bulking up my fish a little. I want to see them as healthy as possible, and it looks like things are going well overall.  In fact, some of the young discus that I raised last year have paired up and begun to spawn lately, which is incredibly cool because it is the second generation of discus that I have bred. I'm not really looking to raise these babies right now - though I would love to - because I would have to move the three other adult discuses the rest to the tank below them, but I am currently using that tank as a quarantine tank (QT) for four longfin albino bristlenose plecos that I plan to introduce to my other tanks as soon as I can be reasonably sure that they won't contaminate my "native" population with any foreign disease or parasite, etc.

I learned my lesson about the value of a QT tank last October. I bought two of those same plecos as well as a koi angelfish, two snowflake discuses, a blue diamond discus, and a red melon discus from Wattley Discus in Miami and did not bother to quarantine them before introducing them to my general population. It's really not the hatchery's fault. The blame is on me, but the result was a disaster on a magnitude that I have never had to deal with before, simply because nothing seemed to be working for a long time, and it was costing me a small fortune to medicate so many tanks. I have over 350 gallons in total from my 7 tanks, and medication is not cheap! It was a depressing few weeks, and I lost many discuses (thankfully, none that I had paid for, since I had raised these myself), including some of my best babies, but I was lucky enough that some of them pulled through and now they are even spawning new broods. On a side note, the red melon has quickly become my favorite discus. It has such strong, dramatic colors, especially against the light blue background of the tank. I'll post a picture of it below, just for kicks, even though it really doesn't do this fish's colors much justice.


To be honest, I do want to raise one of these new broods. The pair that is currently spawning lay an incredible amount of eggs each time they do so, and they seem to be good parents, taking great care of these eggs while beating the crud out of any fish that gets near them. I'm really just dying to see what the babies will look like, since the parents have a lot of blue themselves, and their father was a blue diamond (the mother is a turquoise), meaning that I can expect at least 25% of these babies to be solid blue like their grandfather. That's really what I am aiming for with that particular breeding line. I'd like to see if my 25% theory pans out.  Here is another picture (last one, I promise!) of one of the parents with the first batch of eggs. See you next time!


Saturday, May 21, 2016

THE FISH ROOM PROJECT - Update #4

THE FISH ROOM PROJECT


Update #4

It's been a couple of months since I last posted, but I finally have a bit of free time to relax and write about what I've been doing with my mini-fish room project. The 1" pipes really worked out well and gave me exactly the flow I need while offering me a number of plumbing options and maximizing my usage of space behind the tanks. The first drain system I installed didn't quite work out, so I tore it down and re-did everything (recycling whatever pieces I could, of course). It's too bad I didn't notice the problems that the first drain system had until after I had glued everything together and tested it, but I guess that's what a test run is all about! 

Anyway, this drain system is working out well. It's what I should have done to begin with. I don't have any pictures of my current drain and return plumbing setup for the filter yet, but I've done even better this time: I finally have a video that I can share with you now..! Here is it!


On my last post, I was debating whether to connect the vertical drain pipe from each of the tanks above to the tank directly below them. You will note that this is not wha you actually see in the video. That's because I decided to try it out, and much to my chagrin, discovered that a straight 1" tee will not function properly as a drain if there is water flowing from above into the same pipe that it connects to. Essentially, it didn't work out. I couldn't connect the drain from the top tanks directly to the drains from the bottom tanks without having a little bit of water from the top tanks flow into the bottom. That also means that the bottom tanks were not draining properly.

I could have done something like this with 2" overflows on my tanks because there is a piece (a drain tee) that is designed specifically for this sort of application (it has a curve to it that prevent water from flowing into the side outlet. However, that would have been overkill in terms of flow rate, which is not really a problem. I just designed the system with 1" overflows in mind because that's all the flow rate I needed while maximizing the space behind the tanks.

An important side not for anyone building a fish room: leave yourself enough space to work with behind the tanks. You'll be spending a great deal of time there, especially at the beginning, and you need room to work, tighten pieces, adjust, turn around, etc.

In the end, I am pretty happy with my little setup. Put simply, it works as intended. Now I have to install lighting and lids, but that should be relatively easy and not really vital to the success of the rack as a system (not yet anyway). Instead, I think I'll turn my focus to purchasing, installing, and plumbing a large water tank in the corner of the garage. I'm going to install a constant drip system for automatic water change system so I will not have to break my back with buckets, etc. and I can achieve the greatest consistency of water quality.