Monday, March 14, 2016

The Fish Room Project: Update 3

The Fish Room Project

Update #3

Last time I posted, I realized that my blog wasn't very eye-catching. I was missing images, something to give my blog some life, ideally something that would illustrate the stuff I've been writing about. Therefore, I determined to take some pictures of the next step, and this time I was prepared!

I was pleasantly surprised to receive the bulkhead kit on Saturday, just as I made up my mind to go ahead and drill the tanks. This was exactly the push I needed. I finally got up the nerve to do it, and I am very pleased with the results. I'm going to post some pictures and captions below and just get out of the way for now.

I set out to drill the tanks first thing in the morning (after feeding the kids, of course)...


I covered the work area, brought in the hose, got my materials together, etc.


I wasn't able to film myself drilling the holes, but the long, loud squeaking of the diamond hole saw was worth it. Actually, I was surprised that the glass didn't take longer to drill.  GLASS DRILLING TIP: Besides keeping water in the hole cutting area at all times, go gently!  Don't rush glass cutting!


Here are the tanks, freshly drilled, lined back up on a table in my yard.  I find it easier and more efficient to prepare all the tanks together, step-by-step rather than setting one up at a time.


I proceeded to paint the back and sides (Krylon Maxx, Coler: Aqua).  I really like how the light blue came out. It looks good against both the black frame of the aquarium and the false sand that I painted under the bottom glass.  You can catch a sense of that look from the tank at the bottom, right side.  The other tank at the bottom is coming soon. I just ran out of paint and plan to swing by Wal-Mart later tonight to buy some on my way home from work.


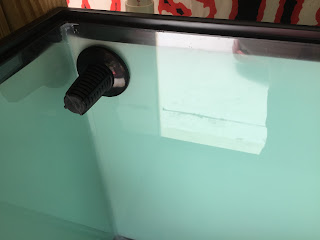
Here's a look at the strainer and overflow.


I noticed that the overflows lined up neatly above one another, so I could conceivably run one length of 1" PVC pipe down the back of the rack and into the drain pipe that will feed the wet-dry trickle filter at the bottom.  I'll think about it for a while. If I do, I had better install some unions in case I want to detach a tank from the system.


I'll keep you posted as I make progress on my mini fish room!

Wednesday, March 9, 2016

The Fish Room Project: Update 2

The Fish Room Project

Update #2

It's been a while since I've written up anything about my project, so I have quite a bit to report upon.  Since my last update, I've painted the bottom of the tanks with a fake stone texture and brick red color to make it look like sand from the inside of the tank. They look pretty nice, but I should have used more of the stone texture because it would have made it look even better. I only used one can for all four bottoms.  I should have known it wouldn't be enough. I also discovered, by happy accident of some polarized sunglasses that my beautiful wife gave me, that the tanks are not made of tempered glass, so I plan to drill the tanks and install regular bulkheads and overflows instead of the PVC overflows. I think the PVC overflows looked kind of cool in their own way (my uncle called it "industrial"!), but the traditional overflow is simpler and more reliable, which is what I'm ultimately going for in my setup. The delay caused by this modification to my plan will hopefully be offset by the benefit of streamlining my set up even more.

The diamond coated hole-cutting bits arrived a couple of days ago, but I quickly realized that I had not bought any bulkheads, washers, or any other fitting for the holes I intended to drill. I had done some window-shopping online but more to determine what I needed to do while I procrastinated the purchase, which actually turned out to be a good thing in the end because I saved some money. I had seen some nice low-profile strainers on Premium Aquatics, but they are almost $3 apiece, and that's not even counting the bulkheads. I ultimately went with eBay, where I found a great deal on four complete overflow kits with bulkheads, strainers (not the low-profile type, but I can always get those later), and the whole shebang, which is exactly what I needed.  I also bought a couple cans of a nice, light blue spray paint for the back and sides of the tanks, but I haven't painted anything but the bottoms yet because I wanted to install the bulkheads first. Now that I have the saw bits, however, I might just drill those holes soon, so I can go ahead and install the bulkheads as soon as they arrive.

In the meantime, I'm taking care of a sick discus in the 10-gallon quarantine (QT) tank that I set up on a couple of cinder blocks la couple of weeks ago. I kind of like the look of the cinder blocks to be honest. I think I'd really like to do something with that in a future build. As for the fish, I had two: a bigger one that did not fare well in the transition to the QT tank and died only a few days later, and this one. This one is doing better but hasn't eaten much, if anything at all, over the last few days.  I'm beginning to think the sickness that has been afflicting many of my baby discuses is parasitic in nature.  In any case, I have the tanks on a regiment of at least 25% water change every couple of days. I just need to stock fewer fish.  I don't want to keep more than a handful of the babies. so I will probably cull the smallest of the discuses and remove all but 4-5 from the the the the the 55-gallon tank in the living room.  If I have the rack set up by then (highly unlikely), or at least in place (which is more likely), I can even take the 55-gallon out of the office and put it in the garage in the spot, if not on the stand, that I intend to put it anyway.

I'll keep you posted...